
How to work with your screenshot snipping tool
With your Snipping Tool open, to create and work with your screenshots, choose one of the options below.
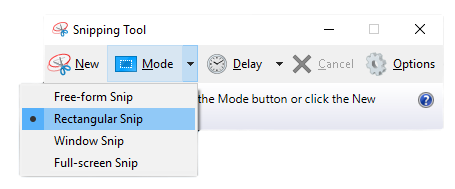
Capture a snip
Select Mode in the Snipping Tool. Select the arrow adjacent to the New button in earlier versions of Windows. After that, when you select the type of snip you want, the entire screen will turn grey. Then select the region of your screen that you wish to record from anything currently shown on the screen.
Capture a snip of a menu with screenshot snipping tool
- Open the menu you wish to capture after you’ve opened Snipping Tool. Before you launch the menu in Windows 7, press the Esc key.
- Ctrl + PrtScn are the keys to use. The entire screen, including the open menu, turns grey.
- Select Mode, or select the arrow adjacent to the New button in prior versions of Windows. Choose the type of snip you want, then the portion of the screen capture you wish to capture.
Annotate a snip
By selecting the Pen or Highlighter buttons after capturing a snip, you can write or draw on or around it. To erase the lines you’ve drawn, choose Eraser.
Save a snip
- Select the Save Snip button after you’ve captured a snip.
- Type a file name, location, and type in the Save As box, then click Save.
Remove the URL
The URL shows below the snip when you grab a snip from a browser window and save it as an HTML file. To prevent the URL from displaying, do the following:
- Select the Options button in the screenshot Snipping Tool.
- Clear the Include URL below snips (HTML only) check box in the Snipping Tools Options box, then select OK.
Share a snip
Select the arrow next to the Send Snip button after capturing a snip, and then choose an option from the list.
Keyboard shortcuts to use in Snipping Tool
| Press these keys | To do this |
|---|---|
| Alt + M | Choose a snipping mode. |
| Alt + N | Create a new snip in the same mode as the last one. |
| Shift + arrow keys | Move the cursor to select from different types of snips. |
| Alt + D | Delay capture by 1-5 seconds |
| Ctrl + C | Copy the snip to clipboard |
| Ctrl + | Save the snip |
Enlarge, rotate, or crop your snip
Select Edit > Edit with Paint 3D while your clip is open in Snipping Tool to use capabilities for scaling, color, text, and many other adjustments.
Print a snip
Right-click on your snip in the folder where you stored it. Choose Print from the drop-down menu and customize how you wish to print your image.
Place tool on the taskbar
Type snipping tool into the taskbar’s search box. You’ll notice the Snipping Tool program along with a list of options. Select Pin to Taskbar from the drop-down menu.
Delay your screenshot snipping tool
To begin, make a list of the menu items or other elements you want to capture. Select Delay in Snipping Tool and then, for example, 5 seconds. To begin the 5-second countdown, select Mode. Open a menu or otherwise compose your image in less than 5 seconds. When the screen turns grey after 5 seconds, use the mouse to draw around the area you wish.
Related info
Also read about: Use Snipping Tool to capture screenshots
For info about other Windows 10 update, see Windows 10 free from windows 7